2015 is here already. The older I get, the faster time flies by. I like to reflect on the projects I've done in the past year whenever a new year comes along. 2014 was a busy one.
First off, my largest project was completed: I finished my Masters degree. That was a major achievement for me and freed up a lot of time. It was a lot of work, but for those that are on the edge, I definitely recommend doing it. With the way the job market is, it's nice to have a little more credentials if I should ever need to find another job.
I got heavily into RC aircraft in 2014. I went from having a somewhat functioning quadcopter to a fully functioning quadcopter, a mini-quad and 2 RC airplanes. I learned a lot about electronics and radio frequencies throughout the year because of this hobby and will definitely be continuing it into 2015.
I toyed a lot with my Corvette last year, but ended up trading it in for a Jeep. I've always loved Jeeps and have another project that should arrive in June that requires 4 doors. Jeeps are awesome to tinker with and I've already started with mine. I also wanted to get back into webdesign, so another project I started is http://www.jeepparking.com. I'll be posting my development efforts for that at http://jeepparking.blogspot.com. I've always wanted to make an image hosting site that focused on vehicles, so what better vehicle than the almighty Jeep.
2015 should be interesting. Besides having my first kid on the way, I plan on continuing toying with my quads and working on JeepParking. As much as I've wanted to get back into my game development, I simply haven't had the time. Growing up seems to be a big game of priorities and figuring out what gets done when. I'm sure 2015 is going to hold it's own set of lessons for me to learn.
For the last few weeks I've been thinking a lot about AstroMiner. I really want to get back into it but a few things hindered me.
1) AstroMiner was written using XNA. XNA is no longer being supported by Microsoft so any continued development seems like a waste. It was neat at first in that I could play it on my Xbox and my PC but there are other libraries that could help support that.
2) Multiplayer support. My biggest regret with AstroMiner is not building in multiplayer support from the beginning. Adding it in was a massive rewrite and was a huge, huge hassle.
3) Time. I started my Masters program and just didn't have time to develop for fun anymore.
Time is something I'm always going to have issues with. My masters program finishes this summer and I should have a lot more free time once that's done. As for multiplayer and XNA, there's only 1 other option for that: a rewrite. So I've decided to do just that. I'm going to leave C#/XNA and instead switch to C++/SDL. I might give Unity a shot just to see how far it's come but I think I'm going to end up with the same conclusion.
So nothing to report today.. just set up my environment. I've going to be using CodeBlocks as an IDE since it's free. I debated Visual Studio Express but I think it'd be interesting to try a new IDE. I've also got some great ideas on how to re-architecture so I can be a lot more flexible in the future. C++/SDL should also give me some nice speed increases.
Hopefully I'll have a better update in the next week. Fortunately for once I have plenty of art and sound before I start the project.
Made some good progress today on the HUD. I've added the capability to have multiple screens using individual class files. This means I can have a screen for the track, a screen for the daily drive, a screen for GPS, a screen for music.. and so on. Since I don't want them instantiated more than one time, each screen is a static class. I know that I'm the only one programming this thing so I'm essentially saving myself from myself when I do that. All the screens also inherit from a screen base class that sets some initial parameters.
I also added the ability to horizontally flip the entire display. This is necessary because once the HUD is installed, it is going to reflect off a mirror onto the windshield. That mirror is going to flip it, so I need to make sure it's reversed before it gets to the mirror. That was an interesting task in itself. I'm not sure that my approach was the best one, but I started by making a Flow Dependency Matrix for the graphics class for the display itself (which was created by Adafruit).
Please excuse the bad handwriting.
I needed to combine that with the ST7335 class that inherits the graphics class. The circles in blue are the ST7335 class and the methods it overrides. Once I had that mapped out, I was able to more accurately see who is calling what. This is important because when I use drawCircle(), I am passing in an X and Y coordinate. I need to flip the X coordinate but also make sure that I am not re-flipping it down the line. A good example of this is the fillRoundRect() method. fillRoundRect() draws a rectangle with beveled edges. So one might think that you should flip the X in there, right? Well it really calls the fillRect() method and the fillCircleHelper() method. That means that the X will be re-flipped in fillRect() and throw everything off. By mapping everything in the FDM I was able to trace all the methods and find out who calls what. After taking my time and carefully placing all the flips in their right methods, I can now horizontally flip the screen using a single line of code:
tft.setHorizontalFlip(true, SCREEN_WIDTH);
tft is the class that draws directly to the screen. setHorizontalFlip() is the method that sets a private boolean variable to whatever is passed in (which in this case is true). SCREEN_WIDTH is, well, the display width of the screen. This is what allows me to flip the X. The formula to flip the screen is pretty simple:
if (shouldHorizontalFlip) x = horizontalFlipAmount - x;
horizontalFlipAmount is the private variable that is set to SCREEN_WIDTH. Pretty straight forward when inserted into the right spots.
So I'm at the point where I can build some screens. I have a few concerns about the display right now. When I rented a Camaro with a HUD a few weeks ago, I noticed that you can clearly see the edges of the display. It looked like a screen reflected onto the windshield whereas with my car, there are no edges (because it's not an actual screen, it's more like your old alarm clock display). I want to avoid that if at all possible. The other concern I have is the refresh rate. Similar issue to the Camaro in that you could almost see the lines scanning along the display. That kind of issue will be hard to work on because I need to physically install the HUD in the car. Installing the HUD in the car requires me to take out the entire dashpad which is a long process in it self. I have to do that anyway so I can sniff the serial line so I need to plan a few days where I don't need to use my car so I can take it all apart and play around. An idea I had for a possible fix is to use an OLED screen. I found this 1.5" screen on ADAfruit that might work but it's too small. I really need something that's at least 2" due to the width of the display area. I'll have to look around and see if I can find a larger one.
So that's where I am right now. I'm going to spend the week creating a tachometer display and throw some fake data in there so I can see it animate. Hopefully I can get a good video together showing everything off :]
Long story short, I'm creating a new custom heads up display HUD for my car. The car already comes with a HUD but I wanted something more modern looking and I think this project will be a great challenge for me.
I honestly really love this new project. I love the hardware aspect. I love the software aspect. I love the framework I've built. I think it's going to be seriously awesome when finished. I'm even adding bluetooth support to the HUD so I can adjust options and update the software from my phone. I also have micro-sd card support so I can store images on there and use them as boot up screens. All in all it's going to be awesome and I can't wait to road-test it.
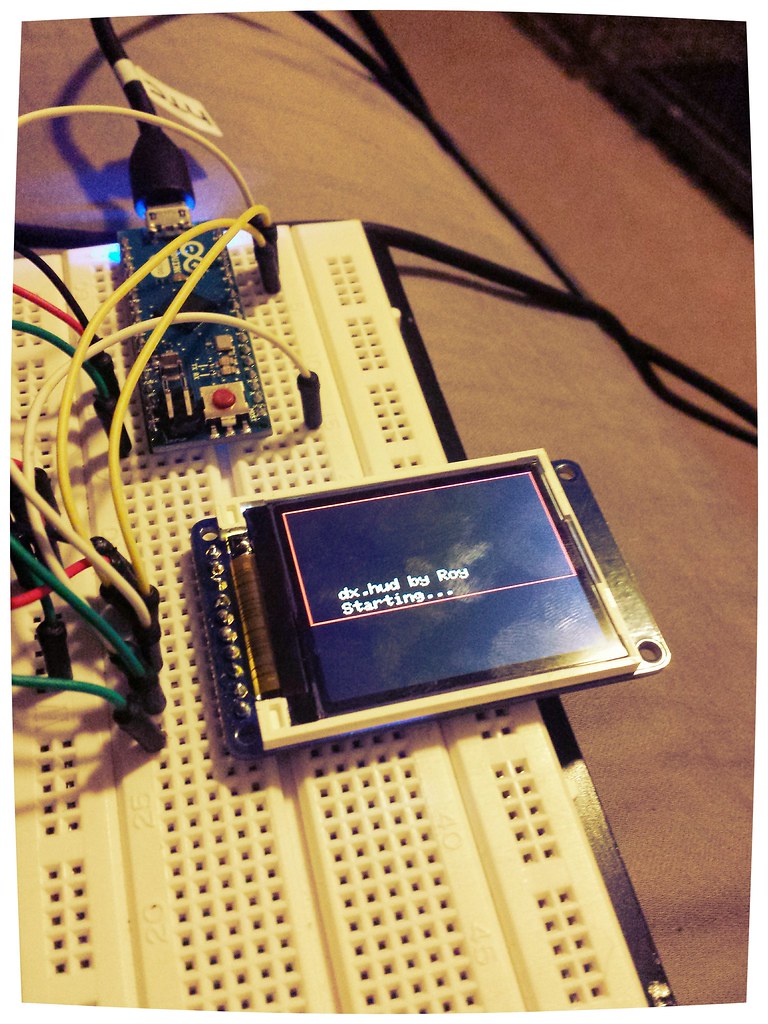
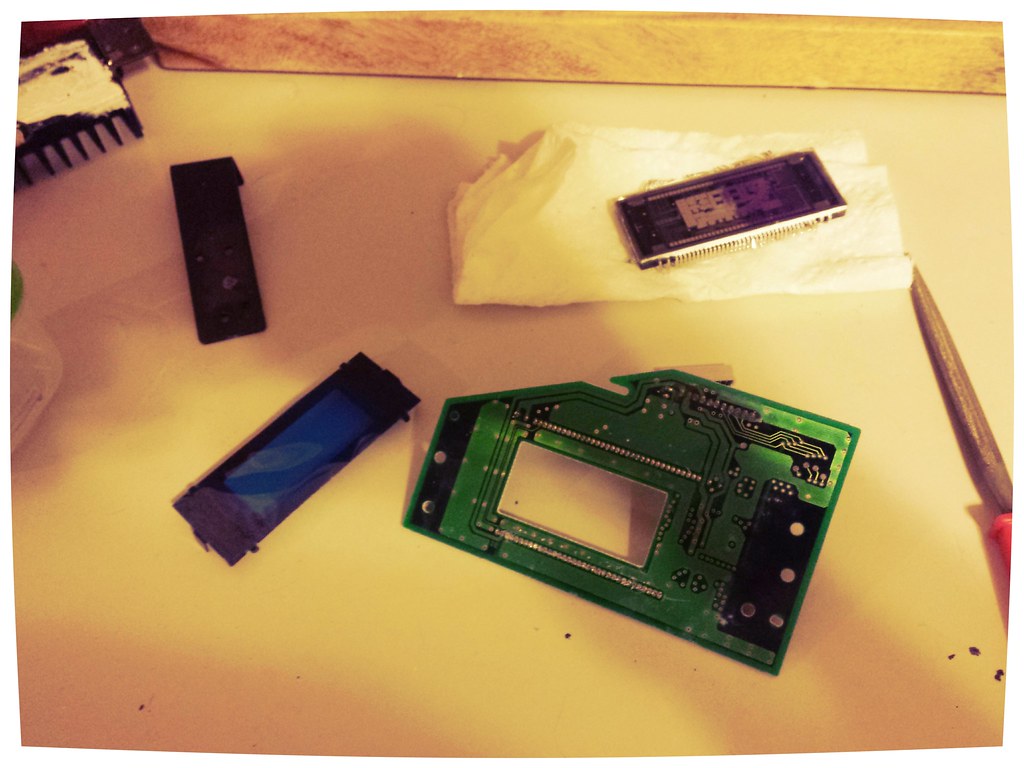
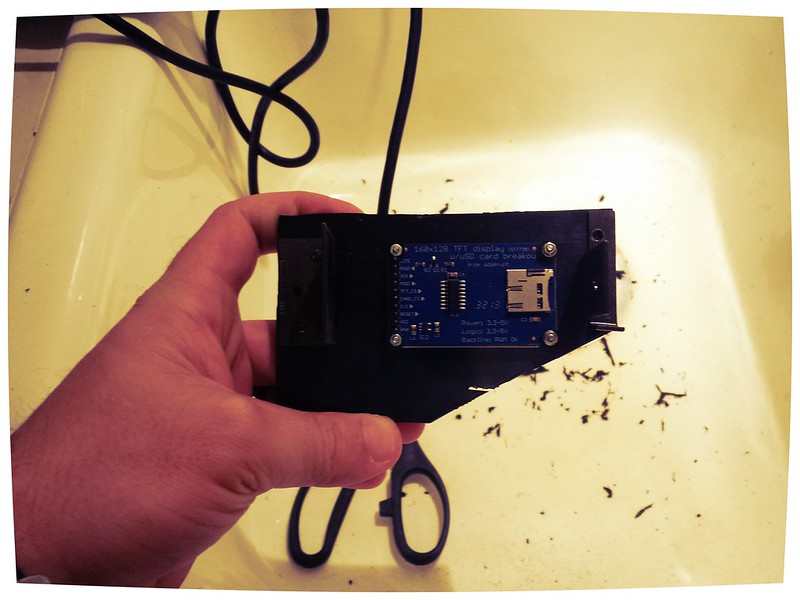
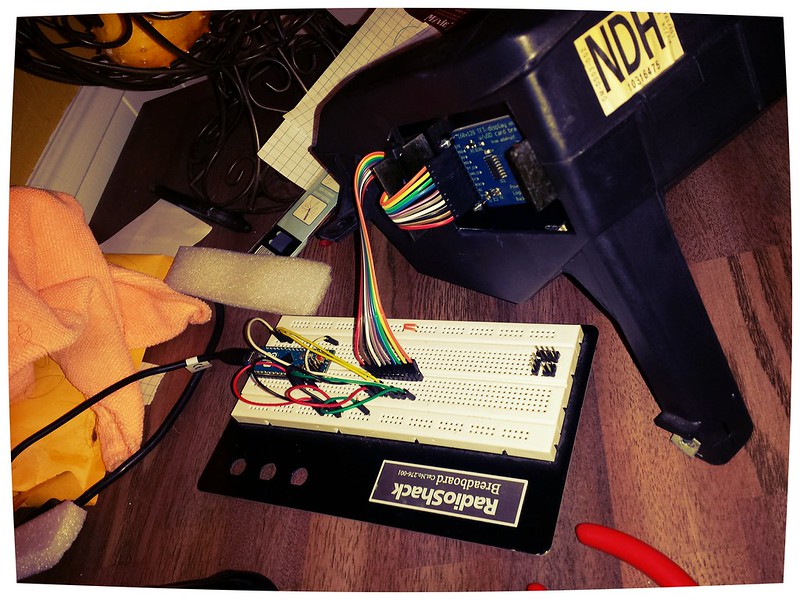
So let's start with where I am. Last week I got a used GM HUD and took it apart. After examining the whole thing I've come to realize that there is only 1 piece that I really need to replace and that is the circuit board for the display (that's the picture in the post you see above). The entire rest of the unit can stay exactly as-is. Once I knew that, it was time to get to work. I started with the software part. I wanted to get something started before I tried to mount my HUD into the GM HUD. This is my little setup.
I'm using an Arduino to control the screen. I only have 32KB of space to work with. I can upgrade to a 256KB unit in the future but I want to see if I can make the core fit in 32KB first. What you can't see in this picture is the micro-sd port on the other side. The red box you see on the screen is actually the usable HUD area. It looks tiny, right? That was one of the most surprising things about the GM HUD. The actual HUD screen is very tiny.
Once I had that running well enough, I wanted to see if I could get it mounted in the GM HUD. Time to fabricate :]
Remember that the piece I wanted to replace is the green one in the post above this. I started by taking it all apart so I can re-use some pieces.
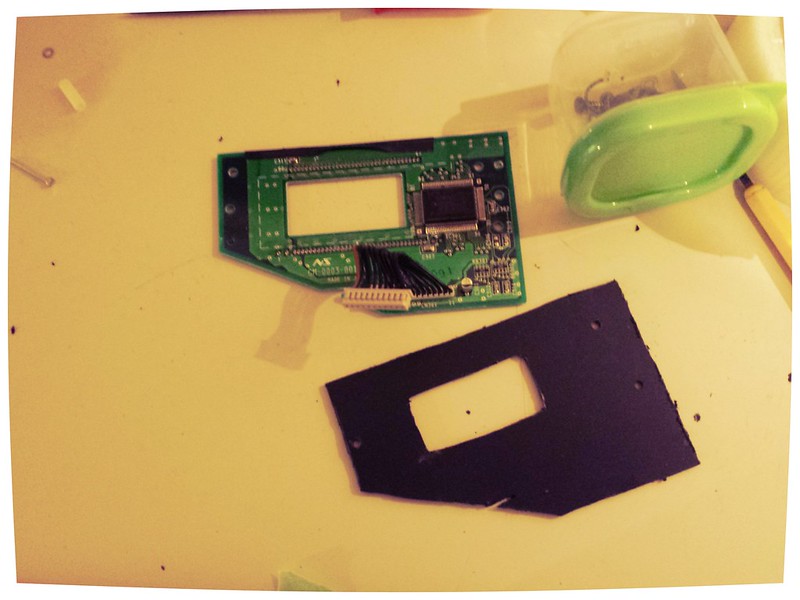
Next came the shape cutting. It's not perfect but it'll do for now. For the final piece I'll have this 3d-printed.
Once I got that fixed up, mounting the screen was easy. You can see the micro-sd card in the 2nd picture.
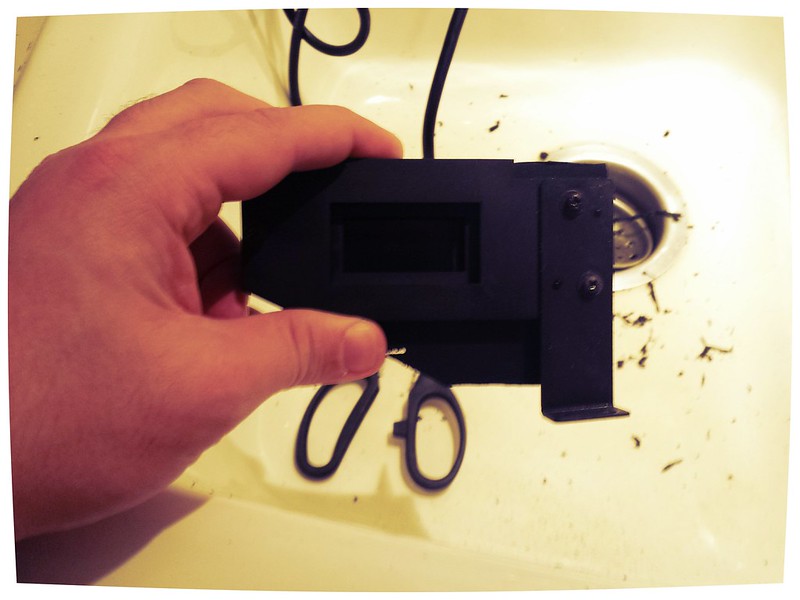
Once that was done, we connect everything.
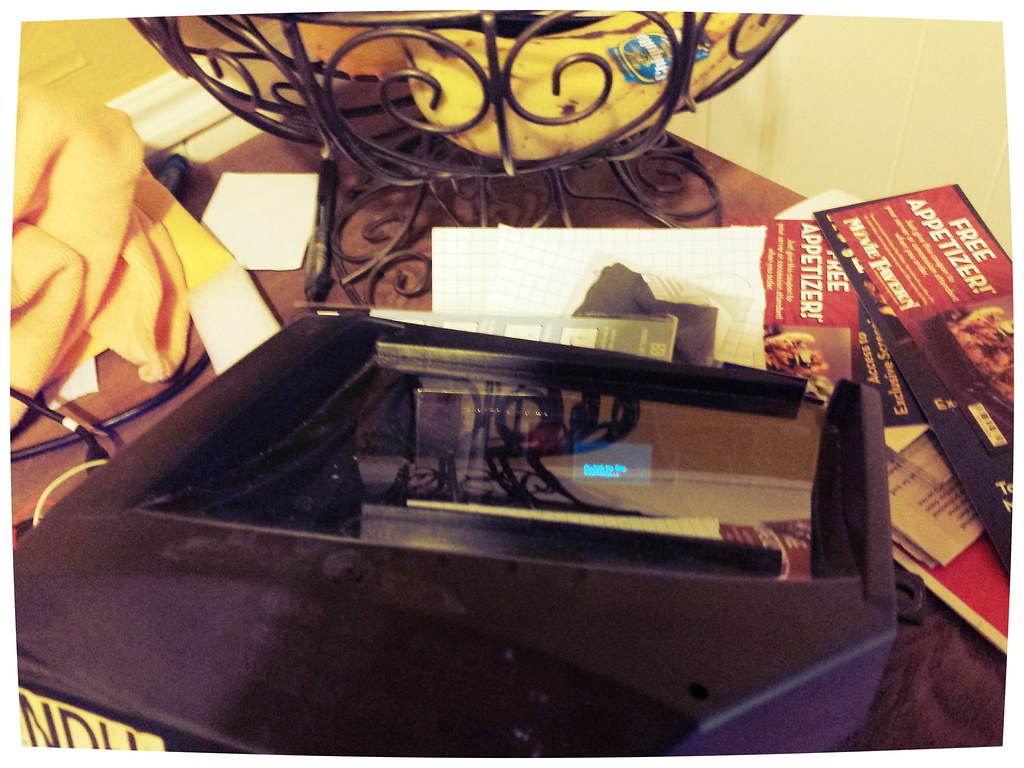
.... and voila!
This will definitely be tweaked before the final version but at least I can now test and play with everything while it's sitting inside an actual HUD unit. The picture is surprisingly clear through all that glass.
Next step is going to be continuing the software development aspect. Flipping the image left->right will be a pretty simple task. From there I'll start to actually build screens. I'm also going to need to take my dash apart at some point so I can sniff the serial line that feeds into the HUD. I'm crossing my fingers and hoping that it's something I can use to read/request data from the computer. If not I am going to have to run a line down to the ODB II port. If anyone happens to know any software people inside GM that might've worked on the HUD, feel free to send me their contact info :]
Let's start with NBF Jeopardy. First, a video of the semi-final product.
After I created the video, I wanted some status LEDs so I wired them up to the top of the box. Unfortunately I didn't get any great pictures of it, but imagine 3 very bright and large LEDs on top of the black box and you'll get the gist. I'm happy to say that the game went without a hitch. Arduino and game functioned flawlessly and everyone was happy. I did learn a lesson at the end. After I added the LEDs, I modified the code to turn the LEDs on when a contestant won. I uploaded it to the Arduino and ran the test, only to find that nothing worked. The buttons weren't working at all and the game was detecting button presses before they were pressed. I took everything apart, checked wiring, checked button functionality, checked the 'mechanical' press and everything looked like it was right. What the hell could it be? I combed through the code and nothing was changed.. at all. Or so I thought. It turns out that the last time I edited the code, I was toying around and instead of detecting a high position on a switch, I switched it to detecting a low position. Yup. I apparently saved this without reverting it back to the correct status. Yup. 3 hours I spent looking for a hardware problem when at the end of the day, it was a simple HIGH to LOW. It was a good reminder that I should always a) backup my working code and b) if I make a change for toying around, revert before I save.
So that happened and it wasn't fun, but I got it all sorted out and everything was great. Onto my next project.
I posted before about my quadcopter. It's a ton of fun to fly around and see how high I can get without crashing. I was using a OpenPilot CC3D flight controller because it's Open Source and fun to tinker with. I also love the ground control software (GCS) and how easy it was to get everything set up. There's a wizard that walks you through every single step from setting up your bird to setting up your controller. Can't beat that. Unfortunately, a few days ago I was flying in some high winds. I'm not sure what happened, but out of nowhere my quad flipped a few times and slammed hard into the ground. It was sad and I should've gotten pictures, but I ended up with 2 broken quad arms, all props were done for and the worst part: a broken cc3d. At first I thought all was well, but then I noticed that channel 1 was no longer receiving input and the cc3d was not able to engage the speed controllers. I tested every component of the quad separately and they all functioned fine. It really was the cc3d.
So my next step was to research flight controllers. I found several great ones. ArduPilot stood out as my possible next purchase. MultiWii looked awesome as well. Then I remembered the main reason I got into this: I wanted to eventually make my own flight controller. I have an Arduino. I have sensors. Why not try?
So I got to tinkering. I started by ordering a BMP085 Pressure Sensor (for detecting altitude changes). I also ordered a L3GD20 3-axis Gyro to pair with an accelerometer and detect the angle of the quad. I have the accelerometer and a GPS already, along with an Arduino Uno, Micro, Mega 2560 and who knows what other Arduino.
So while I waited for the sensors I ordered to come in, I started reading about how I can get input from the receiver. This was much simpler than I thought. First off I tried using pulseIn(). This seemed like the most obvious approach until I realized that pulseIn halts the code until it either a) times out or b) receives input. This is not acceptable for a craft that needs to stay in the air. I then read about interrupts and found the pinChangeInt library. This allowed me to use several pins on the Arduino as inputs from my receiver. There are several approaches to measuring the signal, but the simplest one was getting the time in micro() from when the interrupt was HIGH and subtracting the time from when the interrupt goes LOW. The difference is what I can convert to throttle, stick and switch position. Once I got that squared away, it was time to convert all the stick inputs to something that can control 4 motors.
I'd like to start off all of this with a disclaimer. I am not an electrical or aeronautical engineer. I just love writing software. There are probably better approaches to what I'm doing, but this is a great lesson for me and I'm going to plow forward and tweak as I go along.
So for starters, everything has to run on throttle input. One of the issues I found was that the transmitter wasn't exact. With the sticks not doing anything, I would get a variance of -40 to 40 for the input value. I helped solve this by implementing an averaging filter. I also only update the values to the ESC if the average changes by 6. I found this to greatly reduce the "noise" I was getting. Once I got that squared away, it was time to calculate the throttle. Throttle is the foundation of every single future calculation.
Need to use floats because we need some precision. throttlePercent is based off of stick input and THROTTLE_RATE is a constant that can be set to adjust how powerful the stick really is. A rate of 1 is 1:1. .8 smooths things out a little bit and generally the lower you go the less responsive the quad becomes. It's the equivalent of twisting the throttle on a 50cc scooter and a 1000cc superbike.
So now that we have the throttle we want to use, we can adjust the other calculations.
I am not sure if these are right just yet. So far they work in my serial window and the numbers look good. I haven't done a flight test yet to confirm though.
Now that we have that under control, we need to convert these values into something the speed controllers can use. First off, we need to make sure the motors are set up correctly. I'm using the same motor setup that the CC3D uses which is:
Motor 1 = Front Left
Motor 2 = Front Right
Motor 3 = Rear Right
Motor 4 = Rear Left
The motors are defined in a clockwise pattern from the front left. Knowing that, we can use the following to set the motor outputs:
  motorValues[1] = 1000+(throttleToUse + rollAmount - pitchAmount + yawAmount); // cw, front left
  motorValues[2] = 1000+(throttleToUse - rollAmount - pitchAmount - yawAmount); // ccw, front right
  motorValues[3] = 1000+(throttleToUse - rollAmount + pitchAmount + yawAmount); // cw, rear right
  motorValues[4] = 1000+(throttleToUse + rollAmount + pitchAmount - yawAmount); // ccw, rear left
1000 is the speed controller off position. With the throttle being all the way down, nothing is going to happen. As the throttle increases, the rate of roll, pitch and yaw can be adjusted.
Now that I had this setup (and tested in the serial output), I wanted to add altitude hold. By now my sensors had come in and I have both the gyro and barometer connected through i2c. The Arduino libraries make reading these inputs very, very easy.
For barometer, we just run bmp.readAltitude(); to get altitude. I have a mix on my transmitter to allow a 3 position switch on channel 6. Position 0 is normal flight. Position 1 is altitude hold and position 2 is position hold (using GPS). To hold the altitude, I get the current altitude as soon as that switch is put on position 1. Each time I run through the loop, I get the current altitude and find the difference. I then use that difference to calculate whether I need more or less throttle (to go up or down).
So right now, all libraries and my code are 13,634 bytes. This leaves me 18,622 bytes left to finalize everything. I still need to implement position hold and Attitude mode which I'm thinking is going to take me up to ~20,000 bytes. I will do my best to do some optimization at that point and see how low I can get the codesize to be. One of the things I don't like right now is that it's all purely functional. There's no OOP present at all (besides the obvious stuff). This was fine for a prototype, but I want to clean this up for future use.
So with everything running and looking ok in serial mode, I wanted to do a power-on test. I plugged everything in and drew power from the speed controllers. Everything turned on. Then I plugged the speed controller power into the arduino. Things beeped and the Arduino indicated it was ready. I gave my tx a little throttle and the speed controllers burst to life. 5% max. I then adjusted the pitch, roll and yaw and I could hear the motors adjusting accordingly. I killed the power afterwards and considered it a successful first power-on test.
So what's next?
First, I need to fabricate a case for everything. I have a spare proto-shield that I will set up so I can attach the sensors and GPS onto. I'll then attach that onto my UNO and put together some pins for the ESCs (speed controllers) to attach to.
Once that's set up, I'll mount it to my code and have a first flight. I'll start my having it strapped down just to be safe.
After first flight, I'll continue to refine the code more.
Here is a picture of my current setup:
I'm calling this flight controller dx. dx had a successful first power-on test. Within the next couple of weeks, I hope to be able to report that it also had a successful first flight. Until then.. ~
More progress on my Arduino Jeopardy rig. This is more cosmetic than anything, but I got all the buttons wired up and I'm off the temporary board. I was hoping to host the main control board inside of an Altoids tin, but there are just too many wires so I'm going to pick up a project box from Radio Shack. I also cut up some tupperware we had laying around. I'll be using them as bases for the buttons themselves.
Nothing programmatically to report. Just cosmetic stuff. I'm hoping to get everything completely done by Friday night. We'll see.
My work is having a little offsite and one of the events they want to do is a Jeopardy style game. I thought this'd be a good opportunity to dust off the Arduino and make some fun buzzers. Initially it seems like a pretty simplistic task. You have 4 buttons. 1 button is for the host. This person starts the game and starts each round. The other 3 buttons are for the contestants. Putting it together was straight forward. 4 buttons each feed into their own digital pin. We also have LEDs for each contestant that light up when they're the winners.
So we haven't done anything complicated yet. I got this part up and running in about 10 minutes. The next part is really the only time it gets complicated. I'll tell you about my very simple solution that I wrote just to get it done and then I'll tell you about my more complicated solution that I'm going to attempt.
The issue is knowing who buzzed in first. Two people can press the button at the same time with a millisecond of difference in between. My simple approach is to have a random button checked first using a random number. This random number is between 1 and 3. If the number 2 is selected, the system checks buttons 2,3,1 (in that order) to see if they're HIGH. If nothing, we repeat the loop with a new number. The random number generator is seeded with one of the analog inputs which produces static noise when it's not being used, so it's randomish. This works but it still gives an advantage. In the example above, the random number selected is 2. If contestant 3 presses in a millisecond before contestant 2, contestant 2 will still win because it is checked first.
So I thought of a more complicated approach that I will attempt if I have some time. I need to research interrupts in Arduino and see what it supports. I am using an Arduino 2560 and I believe it has 6 interrupts, so my thought is that I can put each button on an interrupt. In theory this seems like a much simpler approach because we no longer need the random number generator. Just attach each button to an interrupt and when the button is pressed, trigger a method that tells the main game code that "Button X was pressed." If we're in a round, that person wins. If not, move on. In execution, I think this might be a little more complicated but that's mainly because I haven't done any interrupt work with Arduino yet.
So that's my latest Arduino work. I had to take apart my old Jeeputer that I built to use the Mega 2560 for this project. I'm not sure if I posted about that at all. I'll have to go through and dig up some old notes and videos, but in a nutshell I used the computer to detect the pitch and lean of my jeep so I could make a better decision about how hard I wanted to push up a hill. I also had purchased several relays so I could control certain parts of my jeep with the jeeputer, but I never got around to adding them and I ended up selling the rig. The nice thing about Arduino is it's very easy to quickly prototype something. In the case of the Jeopardy game, I'm not going to bother putting it on an Arduino Pro because it'll be a once and done thing. Here's a quick video showing the wiring and how it all works. I'll make another post later this week when I have the final buttons/lights set up.